Some of the features provided by the Muhimbi PDF Converter for SharePoint Online require a level of privileges slightly higher than what out-of-the-box SharePoint App Store apps are allowed to have. Rather than bypassing the App Store completely, making deployment more difficult, we provide the option to elevate the App Permissions manually, but only when certain functionality is needed.
At the time of writing the only functionality that require elevated privileges are the following:
- Real-time watermarking.
- Hiding the UI integration (For sites that only want to expose Muhimbi's workflow facilities)
- Enabling Ribbon buttons (For sites where the App has been deployed via the App Catalog)
- Creating files using the correct user name when using SharePoint Designer Workflows (Otherwise Created and Updated By fields will use the 'SharePoint App' name. This doesn't require an App Feature to be enabled, just elevate the App)
- Converting web pages (via the User Actions menu)
If you do not require any of this functionality then there is no reason to carry out the steps below.
Below you will find instructions to elevate the App centrally for all site collections, which requires the involvement of a SharePoint Tenant Administrator, as well as instructions for elevating the privileges of the App on one site collection at a time, which requires the involvement the Site Collection's Administrator.
Centrally elevate the App on all site collections
For larger deployments, where the Muhimbi App needs to be elevated on multiple site collections, it is easiest to carry out the elevation process centrally.
Prerequisites
Before starting the central elevation process, please make sure the following prerequisites are in place:
- The user carrying out these steps must be a Tenant Administrator.
- The PDF Converter for SharePoint Online App has been installed in at least one Site Collection as per these instructions.
- For sites that have been created as 'Modern Sites', custom scripts are disabled by default. Please enable it as per this Microsoft Article.
Elevating privileges
If you experience any issues while carrying out these elevation steps, then please check out the Troubleshooting section at the end of this article.
To begin the elevation process, navigate to the SharePoint Admin Center ([your tenant]-admin.sharepoint.com), and add /_layouts/15/appinv.aspx to the end of the URL to access the 'elevation screen' . Please remember to use YOUR tenant's URL, but in our example it is acme-admin.sharepoint.com/_layouts/15/appinv.aspx.
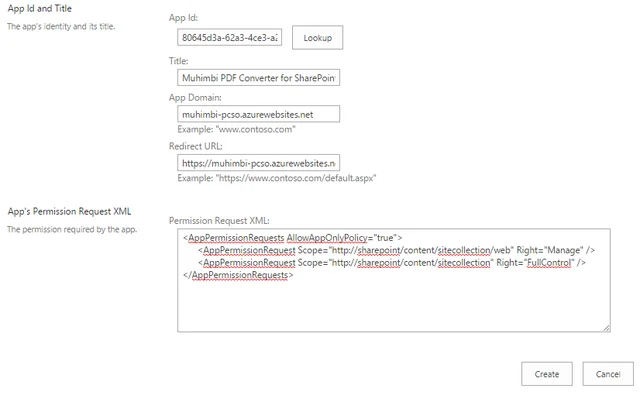
Once opened, fill out the screen as follows:
- In the App Id field enter 80645d3a-62a3-4ce3-a224-ce22188d619c and click 'Lookup'.
- Do not change any of the fields, only paste the following XML in the 'Permission Request XML' field.
The screen should look as follows ( ignore the actual XML, it has changed since the screenshot was made):
Click the 'Create' button to continue to the following screen (it may look slightly different depending on the level at which elevation is carried out):
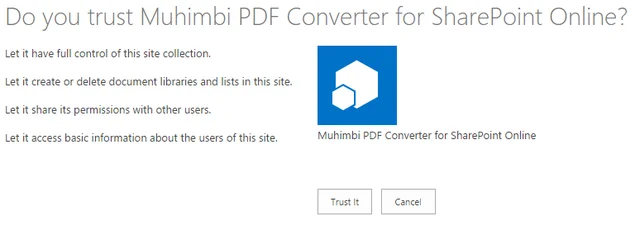
Click 'Trust it' to activate the App's new privileges across the entire tenant.
Elevate the App on a single site collection
For situations where the Muhimbi App only needs to be elevated on a single, or very small number of site collections, or when the SharePoint Tenant Administrator is unavailable, it may be easier to carry out elevation on one site collection at a time.
A video of the process described below is available here. That video shows the various steps at quite a rapid pace, so please take your time to read the instructions listed below.
Prerequisites
Before starting the elevation process, please make sure the following prerequisites are in place:
- The user carrying out these steps must be a Tenant Administrator for the first (optional) elevation instructions. To elevate the Site Collection (2nd part of instructions below), the user will need to be a Site Collection Administrator.
- The PDF Converter for SharePoint Online App has already been installed in the Site Collection as per these instructions.
- The steps described below must be carried out in the root web of the site collection.
- As the elevated permissions (at the site collection level) are reset when the App is installed on a sub-site, we recommend installing the App on all (sub) sites before starting the elevation process.
- For sites that have been created as 'Modern Sites', custom scripts are disabled by default. Please enable it as per this Microsoft Article.
Elevating privileges
If you experience any issues while carrying out these elevation steps, then please check out the Troubleshooting section at the end of this article.
Privileges must be elevated separately for each site collection. To allow user specific regional settings and time zone information to be taken into account when applying watermarks, it is also recommended to carry out elevation at the Tenant level. This is optional and requires Tenant Administration privileges. If you only have Site Collection Administrator privileges then please skip to the ' Repeat elevation at the Site Collection Level' section.
To begin the elevation process, navigate to the SharePoint Admin Center ([your tenant]-admin.sharepoint.com) Add /_layouts/15/appinv.aspx to the end of the URL to access the 'elevation screen' . Please remember to use YOUR tenant's URL, but in our example it is acme-admin.sharepoint.com/_layouts/15/appinv.aspx.
Once opened, fill out the screen as follows:
- In the App Id field enter 80645d3a-62a3-4ce3-a224-ce22188d619c and click 'Lookup'.
- Do not change any of the fields, only paste the following XML in the 'Permission Request XML' field.
The screen should look as follows ( ignore the actual XML, it has changed since the screenshot was made):
Click the 'Create' button to continue to the following screen (it may look slightly different depending on the level at which elevation is carried out):
Click 'Trust it' to activate the new privileges.
Repeat elevation at the Site Collection Level.
- Navigate to the Site Collection and add /_layouts/15/appinv.aspx to the URL (e.g. [your tenant].sharepoint.com/sites/somesite/_layouts/15/appinv.aspx)
- In the App Id field enter 80645d3a-62a3-4ce3-a224-ce22188d619c and click 'Lookup'.
- Do not change any of the fields, only paste the following XML in the 'Permission Request XML' field.
Click the 'Create' button to continue, followed by 'Trust it' to activate the new privileges.
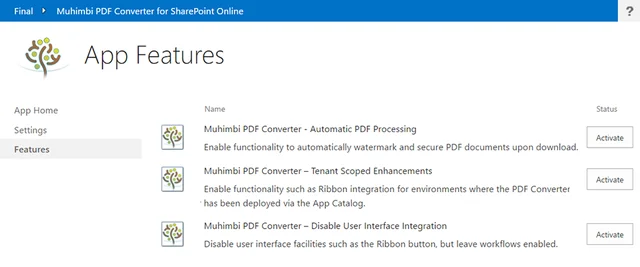
Enabling Advanced Features
Muhimbi's SharePoint Online software uses the concept of 'App Features' to toggle advanced functionality. Enabling these features is similar to SharePoint's own Site Collection and Site Features, however the screen is accessed differently.
The user carrying out the App Feature activations, after the elevation process has completed, must be a 'known-user'. In other words, logged in using the account used to register the trial, or one of the accounts provided when the subscription was purchased. If the menu links are not displayed on the left hand side of the PDF Converter's SharePoint screens then please contact our support desk.
Access the App Features screen as follows:
- Navigate to 'Site Contents'.
- Click on Muhimbi PDF Converter for SharePoint Online.
- The Product Information page for this product is now displayed. Providing you are registered as a known user you will see a 'Features' option on the left hand-side of the screen. If this option is not displayed then please see the Troubleshooting section at the end of this article.
- Click the Features Link, which displays the following screen. Click Activate to elevate the relevant Feature.
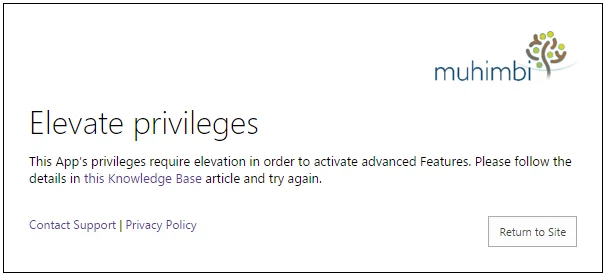
If the following screen is displayed instead, then the App has not been properly elevated. In that case please double check the steps provided above.
Questions / troubleshooting
- The Features link is not displayed: If you don't see this option then please contact the person looking after your Muhimbi Subscription, or email our support desk.
- User is not allowed to open the appinv.aspx screen: For elevations carried out via the SharePoint Admin Center, the user will need to be a Tenant Administrator. For elevations carried out at the individual site collection level, the user must be a Site Collection Administrator.
- After elevation it tells me I still need to elevate: Please make sure the default option of 'allow users to run custom scripts' is enabled on the site collection being elevated. For details see this 3rd party blog post.
- Does the elevation process need to be carried out on other site collections? This process needs to either be carried out centrally (first set of instructions above) or repeated for each Site Collection that requires the relevant App Feature (when using the second set of instructions listed above).
- Does the elevation process need to be carried out on sub-sites? No, elevation MUST be carried out either centrally or on the root site collection.
- Does the App need to be re-elevated after reinstalling? If you ran the App elevated before it was reinstalled then it is recommended to re-elevate to ensure it works exactly the same as before.
- Special steps when uninstalling: When uninstalling the Muhimbi PDF Converter App it is recommended to de-activate the App Feature before carrying out the uninstallation. Doing so an absolute requirement when uninstalling using SharePoint's App Catalog, otherwise it will no longer be possible to access PDF files. This is due to limitations in the App Catalog model. Also, please make sure that the App is still elevated (as described above) when uninstalling the App.